
Alaminüt fotoğraf makinesi nasıl kullanılır?
Alaminüt fotoğraf makinesi, genellikle siyah ve beyaz fotoğrafçılık olarak bilinen türün temel işlevlerini içermektedir. Aradaki en büyük fark, Alaminüt fotoğraf makinelerinin filmden ziyade fotoğraf kağıdı kullanması ve bu kağıdın developman işleminin ayrı bir karanlık odada değil, makinenin içinde gerçekleşmesidir. Alaminüt fotoğraf makinesi, ön tarafında körüklü fotoğraf makinesi bulunan ahşap bir kutudur. Makinenin içinde ışığa duyarlı ve sadece karanlıkta kapağından çıkarılabilen fotoğraf kağıdı ile developman ve sabitleyici kimyasallar bulunan iki tepsi vardır. Kağıdın açıkta kalması için körüklü fotoğraf makinesine küçük bir tutucu adapte edilmiştir. Altı adımda makineden pozitif bir görüntü elde edilir.
How to use an Alaminüt camera
An Alaminüt camera incorporates the basic functions of commonly known black and white photography. The major difference is that Alaminüt cameras use photographic paper rather than film and that the development of that paper happens inside the camera rather than in a separate darkroom. An Alaminüt camera is a wooden box with a bellows camera on the front. Inside the camera is the photographic paper, which is sensitive to light and can only be taken out of its cover in the dark, as well as two trays with developing and fixing chemicals. The bellows camera has been adapted with a small holder for the paper to be exposed on. There six steps to taking a positive image with the camera.
Birinci adım: Odaklanma
Alaminüt fotoğraf makinesiyle odaklama, büyük format bir makineyle benzer şekilde çalışır. Fotoğrafçı arkadan makineye bakar. Objektif üzerindeki örtücü sonuna kadar açıktır ve görüntü makinenin içindeki zımparalanmış cam plakaya yansıtılır. Fotoğrafçı, doğru netleme noktasını bulana kadar objektifin ve bağlı körüğün konumunu hareket ettirir. Bu işlemden sonra örtücü kapatılır, böylece makineye ışık giremez.
Step one: Focusing
Focusing an Alaminüt camera works similarly to focusing a large-format camera. The photographer peers through the back into the camera. The shutter on the lens is wide open and the image is projected on to the sanded glass plate on the inside of the camera. The photographer moves the position of the lens and the attached bellows until he finds the correct focus point. Once this is done the shutter is closed so that no light can enter into the camera.

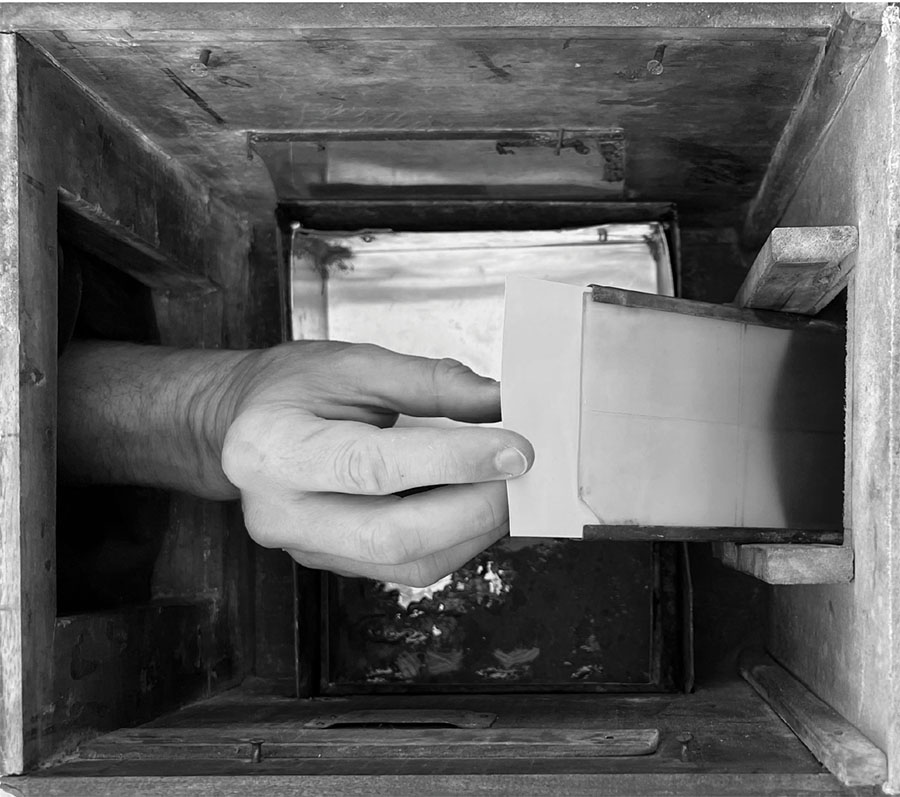
İkinci adım: Kağıdı yerleştirme
Fotoğrafçı, arkadaki ışık geçirmez koldan elini makineye sokar. Bu aşamada kutuya hiçbir ışık girmediğinden fotoğraf kağıdını güvenli bir şekilde çıkarır ve kağıt tutucuya yerleştirir.
Step two: Loading the paper
The photographer slips his hand into the camera through the light-tight sleeve on the back. As no light enters the box at this point he safely removes a piece of photographic paper and places it into the paper holder.
Üçüncü adım: Negatifi almak
Alaminüt fotoğraf makinesinin ışık ölçeri (pozometre) yoktur. Fotoğrafçı ya harici bir ışık ölçer kullanmalı ya da tecrübesine bağlı olarak ölçüm yapmalıdır. Mevcut ışığa göre örtücü ve diyafram hızını ayarlar. Bazı Alaminüt makinelerde örtücü yoktur. Bu durumda objektif kapağı örtücü görevi görür ve fotoğrafçının doğru pozlamayı elde etmesi için objektif kapağını objektiften ne kadar süre çıkarması gerektiğini tahmin etmesi gerekir.
Step three: Exposing the negative
An Alaminüt camera has no light meter. The photographer has to either use an external light meter or measure the conditions from experience. According to the light available, he sets the shutter and aperture speed. Some Alaminüt cameras have no shutter. In this case, the lens cap acts as shutter and the photographer has to time how long to remove the lens cap from the lens in order to get a correct exposure.

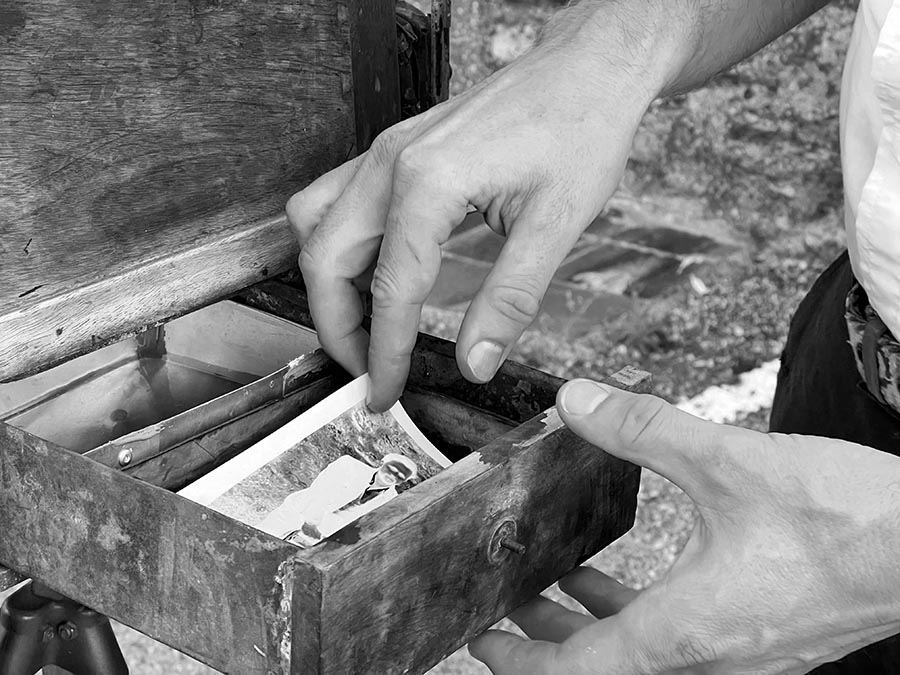
Dördüncü adım: Developman ve sabitleme
Fotoğrafçı pozlama yaptıktan sonra developman kimyasalı içeren ilk tepsiye kağıdı yerleştirir. Developman solüsyonuna bağlı olarak kağıt, ilk tepside iki dakika kadar kalır. Fotoğrafçı developman durumunu kontrol etmek için fotoğraf makinesinin üzerindeki deliği kullanır. Işığa duyarlı fotoğraf kağıdına zarar vermeyen yan bölümden makineye kırmızı ışık verebilir. Daha sonra developman işlemindeki kağıt, sabitleme kimyasalları olan ikinci tepsiye yerleştirilir. Bu andan itibaren fotoğrafçı, tepsiyi ve fotoğrafı çıkarmak için makinenin yanındaki metal çekmeceyi kullanabilir. Kimyasalların türüne bağlı olarak kağıt ikinci tepside beş dakika kadar kalabilir.
Step four: Developing and fixing
Once the exposure has been taken, the photographer places the paper in the first tray, which contains a developing chemical. Depending on the type of developing solution, the paper will spend up to two minutes in the first tray. The photographer uses the eyehole on the top of the camera to check on the developing status. He can allow red light into the camera on the side that does not harm the light-sensitive photo paper. After that, the developing paper is placed into the second tray with fixing chemicals. From that moment on he can use the metal drawer on the side of the camera to pull out the tray and photograph. Depending on the type of chemicals, the paper might stay up to five minutes in the second tray.
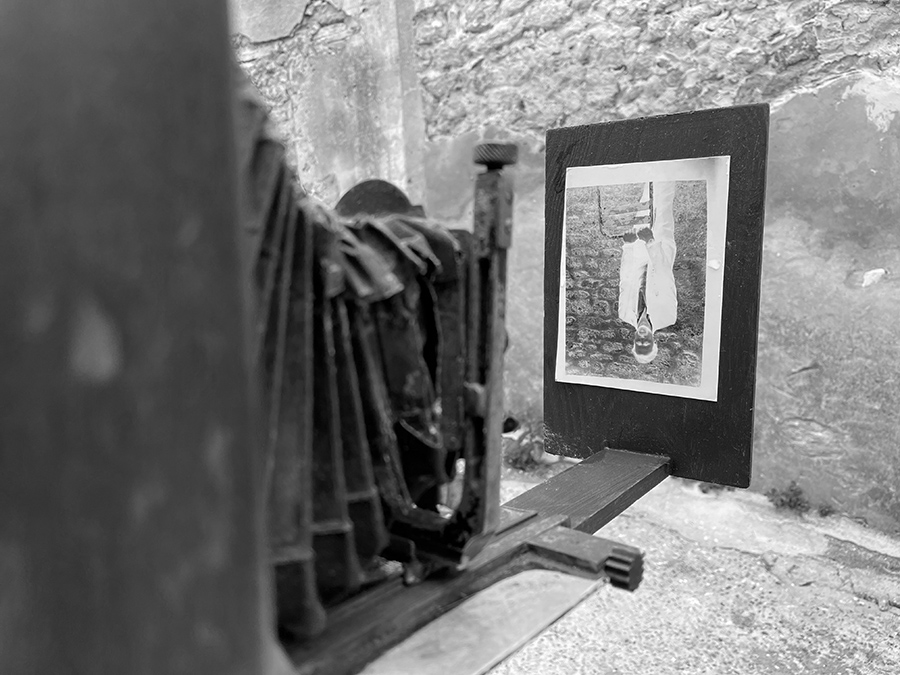
Beşinci adım: Negatifi fotoğraflamak
Fotoğraf kağıdı genellikle karanlık oda işlemleri için yapılır; yani negatif film, pozitif bir görüntü elde etmek için kağıda aktarılır. Kağıdı, Alaminüt fotoğraf makinesinin pozitif ortamına aktarırız ve böylece görsel negatif olarak çıkar. Bu görüntünün pozitifini almak için onu fotoğraflamamız gerekir. Negatiften negatif çıkarsa sonuç pozitif olur. Alaminüt fotoğraf makinelerinin önünde negatif bir tutucu vardır. Negatif üzerine yerleştirilir ve fotoğrafçı negatifi fotoğraflamak için önceki adımları tekrarlar. Developman ve sabitleme yapıldıktan sonra tepside pozitif bir görüntü belirecektir.
Step five: Photographing the negative
Photographic paper is usually made for darkroom processes; that means a negative film is exposed onto the paper to achieve a positive image. We expose the paper to our positive environment in the Alaminüt camera; hence the image turns out to be a negative. In order to get a positive from this image we have to photograph it. A negative from a negative equals a positive. An Alaminüt camera has a negative holder in the front. The negative is placed on it and the photographer repeats the previous steps to photograph the negative. Once developed and fixed, a positive image will appear in the tray.
Altıncı adım: Banyo
Banyo işlemi yapılmamış kimyasallar eninde sonunda fotoğrafı yok edeceğinden görüntülerin yıkanması gerekir. Genellikle fotoğrafçıların elinin altında suyla dolu bir kova bulunur.
Step six: Washing
The images have to be washed, as unwashed chemicals will eventually destroy the photograph. Photographers tend to have a bucket filled with water handy.
